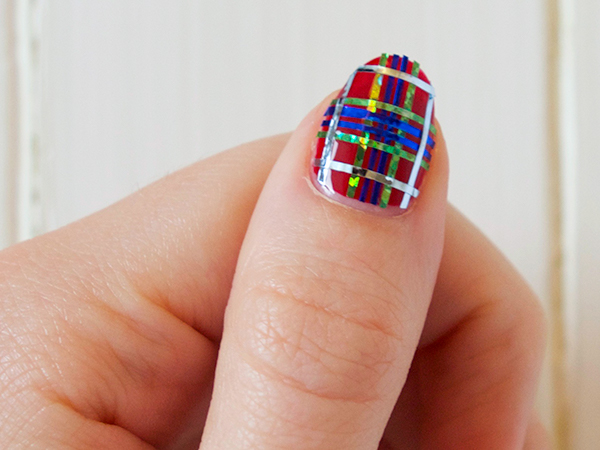

Our very official guide to Fraser tartan nail art, because plaid on your nails is what you need.
We are finally getting into the holiday season — my favorite for nail art, especially tartan nail art.. Something about turning on a really bad made for TV holiday movie about a horse that brought a family together, or a Santa’s my boyfriend rom-com while doing nail art just feels like the holidays. For this nail art look I’m recreating the Fraser tartan design. I chose this pattern because you’ll recognize it once you see it, and because I’ve been reading the Outlander series. It’s in the brain, you know?

You will need red nail polish, a clear top coat, nail art striping tape, and a pair of very small scissors. Striping tape is the one nail art tool that you probably don’t just have lying around. It’s super useful and incredibly cheap though, so I suggest picking up a pack. I Amazon Primed myself a pack of 30 different tapes for about $5. I popped a few into an old tape dispenser to make things easier. For this manicure you’ll need a green, blue, and silver (or white) tape.

The base of this tartan nail art is a cherry red. I used my favorite base coat, ORLY Bonder, then painted on two coats of Spoiled Polish in Slumming On Sunset. Before you start applying the tape, wait till your manicure is totally dry. Also, if you think you will need to do a lot of repositioning of the tape, apply a top coat and let that dry too. The shiny and hard surface of a top coat will help you move the tape without peeling up the red polish.

READ MORE: DIY Carrera Marble Nails
Now we tape. Can you see why I’d rather use colored tape than try to paint perfectly straight, impossibly thin lines of nail polish? That would be a whole lot more work for a less perfect result. The Fraser tartan pattern starts with four evenly spaced tapes ordered green, blue, blue, green.

Then repeat the same green and blue pattern, going across the nail. You can see that I left the tails of the tape just hanging out. Don’t worry about it, we’ll trim them up later. Leaving the tape a little long helps to reposition the tape if you need to.

Last taping step is with white or silver. This time you’ll be creating a square on the edges of your nails. Once you are happy with the design, press down on the tape with another finger to really adhere it to the nails.

You can finally trim all the excess tape and apply your top coat. I used a tiny pair of mustache scissors that I keep with my nail art supplies because it’s the perfect size for detailed trimming. Even though this manicure uses super thin striping tape, it’s still a pretty big design. I wasn’t able to fit all of the silver tape on the rest of my nails because they were too small.

It looks pretty cool regardless. Doing all of your nails with this pattern is definitely a look, and it is a bit time intensive. If you feel like recreating this manicure, start with an accent nail or two before committing to a full Fraser tartan manicure.
Love this article? For more beauty, style, travel, and trending topics check out The Luxury Spot on Facebook. Like us and we’ll love you back!