
Watercolor makeup is the cutest, isn’t it?
We live in a world of nude, monochromatic makeup. As much as we love it (give us a Naked Palette any day) it feels like people have become afraid to wear color. To ease just a little bit of brightness into our look for spring/summer, we’re going for watercolor makeup. This technique gives you sheer layers of color so you can change the brightness to suit your taste.

The cool thing about watercolor makeup is you can build it up in layers. To achieve this effect you’ll make your life about a million times easier if you use a liquid product. Sure, of course, you can blend your little heart out to get the same effect with powders, but give yourself a little break and try liquids.
READ MORE: This Unicorn Hair was Modeled Off the Starbucks Frap
For this look in particular we’re going bright and bronzy for spring and summer. To get it we’re using the NARS Laguna Liquid Bronzer, Giorgio Armani Fluid Sheer Number Nine, Lancome Matte Shaker Liquid Lipstick in Magic Orange, and Colourpop Super Shock Shadow in Amaze. They’re the bomb, but you need to start with your base first.

Especially in spring and summer, we always start with primer. Always. Nothing will wreck your perfectly blended blush than your foundation sliding around underneath it. We’re using the Too Faced Primed and Poreless Smoothing Face Primer for obvious reasons.

Smooth your primer over the areas of your face that can get oily or just need that little bit of slip. It’s also great if you have larger pores because it prevents the liquids we’ll use next from settling into your skin.

After you’re primed, it’s time for foundation. Keeping with the light and translucent theme of watercolor makeup, we’re using the Glossier Perfecting Skin Tint.

Look! It’s a liquid just like everything else we’re using, we like it because it doesn’t look like foundation. This particular product is best for good skin days. It will help to even out your skin tone, cover some redness, and give you that naturally good skin look.

It’s best to work one segment of your face at a time to get a good blend for your whole face. You can go ahead and smooth it over your skin with your fingers, or opt for a sponge if you’re feeling spongy. We just don’t recommend using a brush with this foundation choice.

If you do opt for the sponge, go ahead and apply the skin tint to your face straight from the bottle to avoid the sponge soaking up all of the product. Then you can bounce away to your hearts desire to blend and work the tint into your skin.

This is what it looks like just wearing the skin tint. See what we mean about evening things out? It’s just enough to make a difference without looking like you’re wearing foundation which is perfect for this look.

But obviously, concealer is a must. We’re obsessed with the Tint Idole Ultra Wear Camouflage Concealer from Lancome. Only a little dab will do you for the coverage you’ll need, trust.

We like to apply with the tip of a sponge for precision and an extra blending bonus. Conceal whatever you need from your undereyes to blemishes.

It makes all the difference, especially when using a low coverage skin tint for your foundation.

Next we’re getting the eyes done, so just like your face we recommend using an eye primer, especially if you run on the oily side. We’re fans of the Urban Decay Original Primer Potion, of course, but the NARS Pro-Prime Eyeshadow Base is a great choice too.

On the eyes we’re finally getting into the meat of the watercolor makeup vibes. We’re going to be applying the Colourpop Super Shock Eyeshadow in Amaze in layers. You can see how one thin layer just adds a hint of color and glitter, but layered up you get a gorgeous bronzed peach tone.

Start off your eyes by applying just one thin layer across your whole lid, below the crease. Using a finger is easiest for this because you literally get a feel for the shadow.

Then, you can layer it for a more dimensional effect. We’re making it more pigmented just in the center of the lid for a bright sparkling look.

To ensure you get the most concentration right in the center of your lids, we suggest finishing up by blending out the edges. We’ll come back to the eyes at the very end because we want the cream shadow to totally set first.

Next we’re adding some much needed warmth and definition to the face. Instead of contouring (not good for watercolor vibes) we’re just bronzing it up with the NARS Liquid Laguna Bronzer.

You can apply one or two pumps to the back of your hand so you can work with this product.

It’s super easy to blend out to get a light bronze or a darker, more pigmented look.

We’re heading in with the sponge again to apply the bronzer. We like to apply bronzer just to the high points of the face where you naturally get sun. That’s going to be your cheekbones, bridge of the nose, forehead, and chin. Apply one thin layer for a subtle wash of color, or layer it up for that summer goddess look.

Next is blush! We’re using the Giorgio Armani Fluid Sheer number nine today because of it’s deep garnet color. We’re also big fans of the Lancome Cushion Blush Subtil for a subtle glow, and the Perricone MD No Blush Blush for the most subtle flush.

For the Fluid Sheer, or the No Blush Blush, we recommend dabbing onto the back of your hand so you can apply exactly the amount of product you want. The Lancome blush we mentioned is a cushion compact that you can dab onto fingers or a brush.

No matter what blush you choose, we recommend applying straight to the apples of your cheeks then blending backwards. To get things nice and precise, we’re using the tip of the sponge again to apply the bulk of the color because it’s so small you get all the control.

Then to make blending go exactly one zillion times faster we’re using the fattest part of the sponge to blend. After blending we suggest heading back in with a touch more blush, just on a finger to make sure, like your eyelids, that the color is most concentrated in the middle. This gives a gorgeous effect. Though it’s subtle it’s worth the ten seconds extra effort.

Here’s where we are up to this point. We’ve kept things the definition of subtle so that the lips can take the stage for this whole entire watercolor makeup look.

We’re using the brand new Lancome Matte Shaker Liquid Lipstick in Magic Orange for an easy bright but wearable lip.

Just like everything else, you can lay it on thick for a bright pigmented look, or with a thin layer get just a wash of color.

And, you guessed it, just like the eyes and cheeks we want this look to be most pigmented in the center. We suggest applying the liquid lipstick just to the center of your lips then blending outwards.

The effect isn’t super precise around the edges of your lips which is exactly what we want for watercolor makeup.

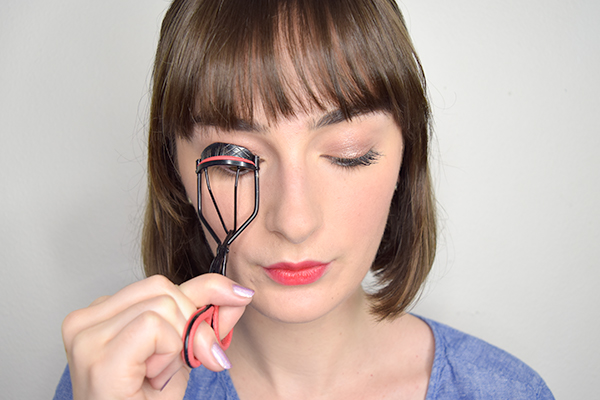
Last thing is just a few finishing touches. We’re heading in with eyelash curlers and mascara to get some semblance of lashes because they do help to anchor this look.

Because we don’t want to overpower this subtle look, just apply one or two layers of mascara. You’ll get the flutter without clumps.

That’s all it takes to get an easy and bright water color inspired makeup look.

Love this article? For more beauty, style, travel, and trending topics check out The Luxury Spot on Facebook. Like us and we’ll love you back!