Your official guide to how to wear glossy lids, because gloss = the most.
Editorial makeup trends will always make us drool over our magazines. The latest trend we can’t get enough of? Glossy lids. They’re having their 15 minutes and we’re here for it. For an editorial look it’s surprisingly easy to do and wear, so long as you don’t mind some meandering gloss, we put together our guide to wearing glossy lids and living your best life while doing so.

Let’s chat first about what you’ll want to wear on the rest of your face before getting into the glossy lids how-to. Just so we’re on the same page, this isn’t really a look you’ll be able to wear all day. The gloss is going to move around and mess with the rest of your makeup. Really, it’s not a question of if but when.
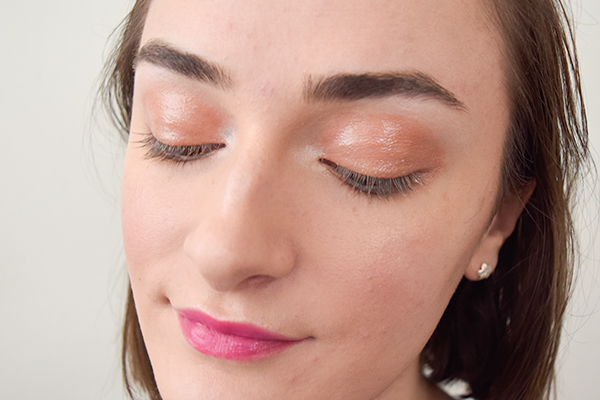
Due to the shifty nature of this eye makeup look, we say go all out on the rest of your makeup. You can get a few snaps out of it, then wipe that gloss right off. Because extra is the name of the game we went for a velvety matte foundation and blush for contrast, a glossy bright pink lip, and lots of the Becca Shimmering Skin Perfector Liquid Highlighter in Moonstone for a highlighter.

Step 1: Apply Lid Color
You could make this incredibly easy and just apply a tinted eye gloss like one of the Milk Makeup Eye Vinyl colors all over your lid. But on the likely chance that you don’t have a tinted eye gloss on hand, you’ll have to go about it the old fashioned way.
We’re using a cream eyeshadow as our color for this look. You can, of course, use a powder eyeshadow but it is going to crease much more easily than a cream shadow. Apply your cream eyeshadow all over your mobile lid.

You can also apply the cream shadow under your lower lash line. Although we won’t be putting the eye gloss there later, it helps to ground the look.

Step 2: Apply Highlight
Next we’re using a white, shimmering cream eyeshadow to highlight the eye. Apply your highlight shade into the inner corner, under the eyebrow, and right in the center of your lid.

Although the lid highlight won’t be super noticeable, it does help to add a little shape to this glossy lids look.

Step 3: Apply Gloss
Now you’ll need to gloss up those lids! You can use a clear eye gloss like the YSL Eye Gloss Smudger, or use a clear lip gloss, so long as it is eye safe. Trust us, the last thing you want to do is apply a lipgloss all over your eye just to get pink eye or something afterwards.
We suggest applying a glob of your gloss to the back of your hand and then applying it to the eye with a finger. It helps you control how much you put on. You’ll notice straight away that you’ll pick up some of your base eyeshadow as you blend the gloss over your lid, don’t worry about it! There’s not a lot you can do to stop it from happening, just maybe have a tissue on hand to wipe off that gloss.

We love how the eyeshadow mixed with gloss creates a slightly grungy yet high fashion look.

You can try to blend out the gloss with a finger but it’s going to migrate all on it’s own. We suggest just applying to your lid where you applied the cream shadow before.

Step 4: Apply Mascara
Last step is to apply your mascara! It’s tricky to apply without getting into the gloss so we suggest angling a mirror below your chin to avoid too much mascara transfer.

You could also apply an eyeliner but prepare for a daunting task. A thick gel liner would work best though it will blend into the gloss and become hazy over your lid.

You can play up this look to be grungier with a darker color, or more high fashion by skipping the eyeshadow all together and just wearing a clear eye gloss.

Love this article? For more beauty, style, travel, and trending topics check out The Luxury Spot on Facebook. Like us and we’ll love you back!


