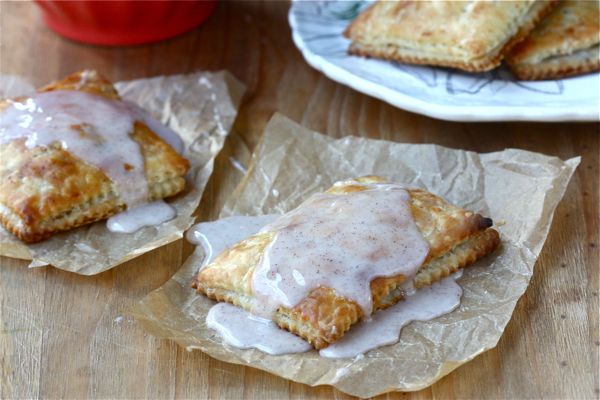
Pear Pie Pop Tarts
Image/Recipe via A Cozy Kitchen
Crust:
- 2 1/2 cups of all-purpose flour
- 2 sticks of butter, really cold and cubed
- 1 tablespoon sugar
- 1 teaspoon salt
- 3/4 water, ice cold
- 1 egg with 1 tablespoon milk ( for egg wash)
Pie Filling:
- 2 Bosc pears, diced
- 3/4 tablespoon cinnamon
- 1 tablespoon sugar
- 1/4 teaspoon nutmeg
- Pinch of salt
- 1 teaspoon cornstarch
Cinnamon Glaze:
- 1 cup powdered sugar
- 1 tablespoon whole milk
- 1/8 teaspoon cinnamon
1. Combine flour, salt, and sugar in a large bowl. Add cubes of butter and mix until you’re left with what resembles coarse meal, with pea size pieces of butter. Add ice water 1 Tbsp at a time, mixing until it just begins to clump together. If you pinch some of the crumbly dough and it holds together, it’s ready. If the dough doesn’t hold together, add a little more water and mix again.
2. Remove dough from bowl and place in a mound on a clean surface. Gently shape into 2 discs. Knead the dough just enough to form the discs, do not over-knead. You should be able to see little bits of butter in the dough. These small chunks of butter are what will allow the resulting crust to be flaky. Sprinkle a little flour around the discs. Wrap each disc in plastic wrap and refrigerate at least 1 hour, and up to 2 days.
3. While you’re dough is in the refrigerator chilling, turn your attention to the filling. Dice up your pears and transfer to a medium-size bowl. In a smaller bowl, mix together the cinnamon, sugar, nutmeg, salt and cornstarch. Toss the diced pears with the cinnamon/sugar mixture and set aside.
4. Remove both dough disks from the refrigerator. Let sit at room temperature for about 10 minutes in order to soften just enough to make rolling out a bit easier. Roll out dough with a rolling pin on a lightly floured surface in the shape of a rectangle with a 1/8″ thickness. Using your cutter, cut the dough into a 9″ x 12″ rectangle. Repeat with the second disk of dough. This is when a ruler really comes in handy. Take your two 9″ x 12″ rectangles and, using your cutter, or a knife, cut each piece into thirds so it turns out that you have nine 3″ x 4″ rectangles. Like I said above, mine were kinda crooked–don’t worry!
5. Transfer a tablespoon of filling to the center of half of the rectangles. Dip your finger in a ramekin of water and run it along the edges of each of the rectangles with the filling. This will hold the two layers together. Place the second rectangles of dough atop all of the ones with the filling, gently crimping the edges together.
6. Pre-heat the oven to 350F. Gently transfer the assembled pop tarts to a parchment-lined baking sheet and transfer to freezer for 10 minutes. After they do their time in the freezer, brush the tops with the egg wash and using a fork, prick four-five holes in the tops. Place in the pre-heated oven and bake for 20-25 minutes, or until lightly golden brown.
6. While the pop tarts are baking up, mix together the glaze. In a small bowl, mix together the powdered sugar, milk and cinnamon. Top the warm pop tarts with the glaze.


