
This spring nail art will get you in the mood for sunshine (not that you weren’t already).
Spring is finally in the air and we’re ready for it. Especially after the last bout of sudden winter weather, we are here for anything that puts us in the springy mood. Which includes, obviously, easy spring nail art. What could be better than wearing springtime florals right on your nails?

For this springy manicure you’ll need only three nail polishes (a base color, white, and yellow), also two dotting tools. For a base color you can choose just about any shade you like besides white or yellow! We went for Sally Hansen Hard as Nails extreme Wear Nail Polish in Royal Hue. It’s the perfect cornflower blue, right?

READ MORE: DIY Lisa Frank Nails
Start off by doing a full manicure using your base color. This particular shade took three coats to get fully opaque. It will make your life a whole lot easier if it’s totally dry before the next step, so you can do this in advance.

On the majority of the nail beds we’re going to do a dot pattern. To start it off you’ll need a medium sized dotting tool (or a bobby pin!) and a good dollop of white polish to work with. You’ll start the dot pattern by placing a column of dots straight down the center of your nail. Make sure to leave a decent amount of space between each dot so the pattern will fit correctly.
From there, place the rest of the dots. Going one column at a time, apply dots in a staggered pattern. Based off the first column, you’ll want to place dots in the middle space between two dots. In the photo above, you can see where a dot would be placed for the next column.

Keep dotting until you have filled your whole nail. Most of your nails will not be able to hold the same amount of pattern, so try to match the spacing for the rest of your nails.

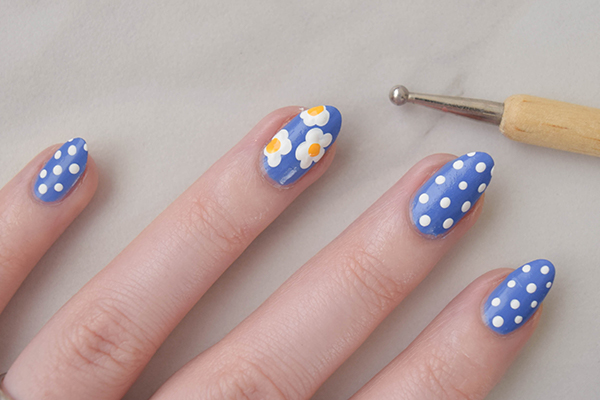
We’re doing an accent nail with daisies, because it just makes it that much more springy. To create a daisy, you’ll need a larger dotting tool. For fingernails that are on the smaller or skinnier side, you may only be able to do one or two daisies. We’re going for one full daisy and two half daisies to fill out the space. You can place dots evenly across the nail as a guide.

Then, you’ll create the petals of the daisies with the same large dotting tool. Five dots around the center should do it and don’t be scared to cover up that center dot a bit. For the two half daisies, we used the guide dots we placed as petals so the pattern could fit nicely.

Once your petals have dried you can place a dot of yellow polish right in the middle for the flower head.

All together you get a pretty, dotty easy spring nail art masterpiece. And you didn’t even need to go to the salon!

And just if you were wondering, here’s the whole manicure without the daisy accent nail.
Love this article? For more beauty, style, travel, and trending topics check out The Luxury Spot on Facebook. Like us and we’ll love you back!